Guides · OBS Studio · Automation · Growth
AI Tools for Streamers: A Free, Local Stack
By Yaseen Khatib · November 12, 2026
The best AI tools for streamers are the local, free ones you can run today: OBS Studio for capture, Ollama for on‑PC AI tasks, Whisper for speech‑to‑text, and FFmpeg for clipping and encoding. This stack lets you read chat mood, spot hype moments, react scenes or overlays automatically, and draft titles—all without sending your chat or mic to a third‑party server. Start with lean OBS settings so your AI has headroom, then add small automations that measurably save time: chat sentiment, hype markers, scene reactions, and VOD-to-Shorts.
Which AI tools for streamers are worth running
Here’s the practical setup I recommend to working Twitch and YouTube streamers:
- OBS Studio (free): Your encoder and scene graph. Keep CPU/GPU headroom.
- Ollama (free): Runs local language models for chat analysis and writing tasks.
- Whisper (free): Local speech recognition for notes, timestamps, or brand‑safety checks.
- FFmpeg (free): Fast, scriptable cuts and vertical encodes for Shorts.
Why this works: it’s private (everything runs on your PC), low‑latency (no round‑trips to a cloud bot), and flexible. If any piece is too heavy mid‑stream, you can pause it without breaking your broadcast.
Start with OBS settings that leave headroom for AI
Your AI only helps if OBS isn’t already maxed out. Quick checklist:
- Use your GPU encoder (NVENC/AMD equivalent) when possible.
- Keep your output resolution and frame rate realistic for your GPU.
- Avoid stacking heavy filters on the same source; spread them across scenes.
- Limit active Browser Sources; pause hidden sources if you can.
- Record to .mp4 or .mkv at a sane bitrate so you can later generate Shorts quickly.
If you want exact dials for low overhead and bitrate picks, use these guides:
- Best low‑CPU OBS settings: Best OBS Settings for a Low-End PC (Low CPU, 2026)
- Bitrate targets for Twitch: OBS Bitrate Settings for Twitch: What to Use in 2026
Set up local AI safely (free): Ollama + Whisper
- Install Ollama and pull a small, efficient model that can classify text and write short outputs. Smaller models run faster on mid‑range GPUs/CPUs.
- Keep a simple prompt file for each task (sentiment, title drafting, clip notes) so you can reuse them.
- Install Whisper (or a lightweight wrapper) for local mic transcription. Use it for markers or brand‑safety lists. Run it only when needed to save CPU.
If Ollama won’t start or models time out, this walk‑through helps: How to Run Ollama on Windows (and Fix It When It Won't)
Five high‑impact AI jobs you can automate now
- Read chat sentiment live
- Method: Sample recent chat lines (e.g., from a pop‑out window or your chat log) every couple of seconds, send them to your local model for a −1 to +1 score plus a short label (e.g., “calm”, “hype”).
- Why: Lets you react faster, and you can tie it to scene/overlay changes.
- Deep dive: Twitch Chat Sentiment Analysis: Read Your Chat's Mood Live
- Detect hype spikes with chat velocity
- Method: Track messages per second and compare to your own stream’s baseline; flag spikes with timestamps. Keep a rolling window so it adapts.
- Why: Chat velocity is the most reliable real‑time signal for “clip‑worthy” moments without parsing your game feed.
- Learn the metric: What Is Chat Velocity? The Clip-Worthy Metric
- Make overlays or scenes react automatically
- Method A (no plugins): Bind a hotkey to toggle a “Hype” stinger or source; trigger it when your velocity/sentiment functions cross a threshold.
- Method B (advanced): Use OBS’s hotkey system plus a lightweight companion script or tool to switch scenes when your local AI flags hype. Keep a cooldown so it doesn’t flail in busy chat.
- Why: Viewers feel your show respond to them in real time.
- Style ideas: Make OBS overlays react to chat hype automatically
- Mark VOD highlights, then cut Shorts fast
- Method: During or after the stream, export your hype timestamps. Use FFmpeg to slice a 60–90s window around each spike, then crop to 9:16.
- Why: You won’t rewatch 3 hours. Let chat tell you where the moments are.
- How to turn streams into Shorts: How to Make YouTube Shorts From a Live Stream
- Draft titles and hashtags locally
- Method: Feed your local model the game/topic and 20–40 recent chat lines. Ask for three concise titles (≤70 chars) plus 6–10 tags. Avoid “trend” prompts that claim platform‑wide data—local models don’t have that.
- Why: You get quick, on‑brand options without leaking ideas to a third‑party tool.
Free vs paid: when should you pay?
| Use case | Free local stack (Ollama/Whisper/FFmpeg) | Paid assistant/tool |
|---|---|---|
| Live mood + hype detection | Reliable if you keep prompts simple and models small | Worth it if it plugs into OBS cleanly with good defaults |
| Auto scene/overlay reactions | DIY with hotkeys or a light bridge | Worth it for a visual rule editor and guardrails |
| Shorts from VOD | FFmpeg works great once timestamps exist | Worth it if you want a timeline UI and rankings |
If you’re comfortable tinkering, the free path is excellent. If you’d rather click once and focus on the show, a paid desktop assistant that stays local can be a better trade.
Quick OBS automation tips that won’t tank FPS
- Drive everything over hotkeys and OBS WebSocket (built in). Keep messages on localhost to avoid network flakiness.
- Fire scene switches on edges (when a condition becomes true), not every frame; add cooldowns to sounds and stingers.
- Keep AI analysis batched (e.g., every 2–3 seconds) so a slow call doesn’t stutter your game.
- Separate “live” tasks (chat mood, hype flags) from “post” tasks (encoding Shorts). Run heavy encodes after you go offline.
How this is solved in one app (Windows, local, no cloud)
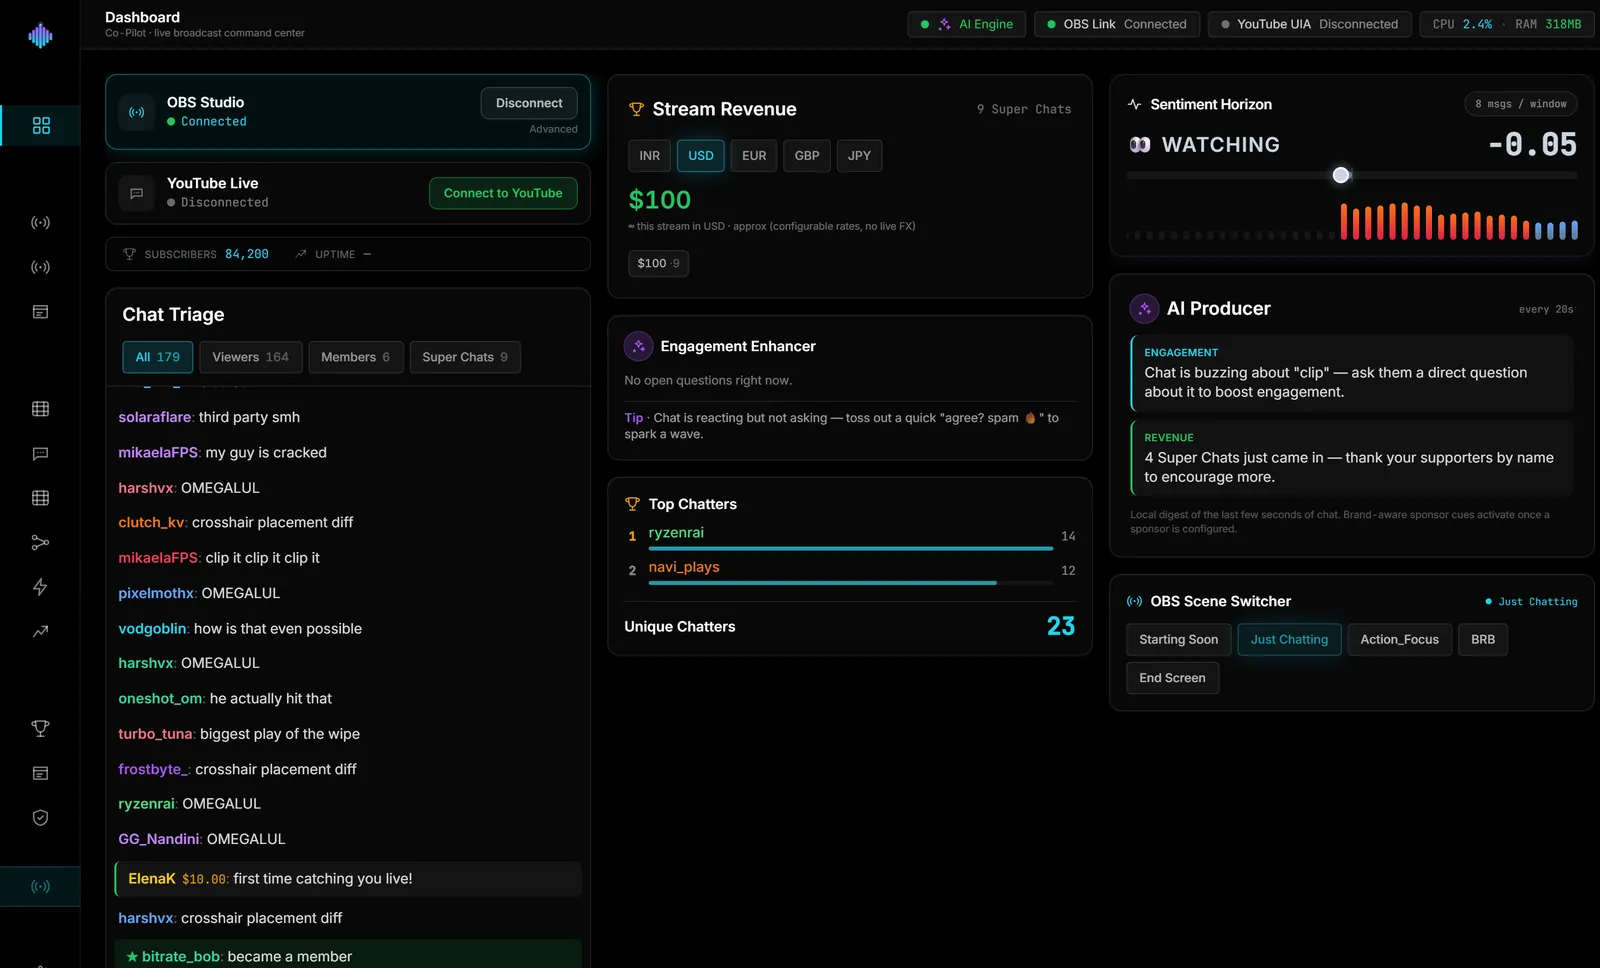
There’s a desktop cockpit that runs alongside OBS on Windows and keeps everything local. It reads Twitch chat anonymously and reads YouTube chat from your own browser window, measures chat velocity and sentiment on your PC, and drives OBS over WebSocket. It includes a visual Auto‑Hype Director (its only triggers are chat velocity and Super Chat amount) to switch scenes, play sounds, or set overlay mood on thresholds; Viral Moments to timestamp hype spikes; a Clip Library that ranks recordings by hype; Shorts Factory to crop/encode vertical clips; an AI Sidekick that runs locally for quick answers and actions; Aura overlays that react to the vibe; and Brand Guard for on‑PC speech checks. Honest limits: Windows only, $29 once after the trial, reads chat but never posts to it, launches February 2027. You can try the live demo in your browser at https://demo.streamerosai.com and, if you pre‑register at pre-register, founding members get the beta first.
Minimal workflow to get results this week
- Day 1: Lock in efficient OBS settings and hotkeys. Verify headroom in Task Manager while live.
- Day 2: Install Ollama and Whisper. Test a sentiment batch on sample chat and a short mic transcript.
- Day 3: Add chat‑velocity thresholds and timestamp markers. Prove you can export them.
- Day 4: Cut one 60s vertical Short around your best spike with FFmpeg. Publish.
- Day 5+: Add guarded scene/overlay reactions with cooldowns. Revisit prompts for clarity.
Frequently Asked Questions
Will this violate Twitch or YouTube rules? Reading your own chat, switching scenes, and local transcription are allowed. Avoid tools that auto‑post to chat or pretend to be a human; keep any automation clearly under your control.
What PC do I need to run local AI while streaming? Aim for 16 GB RAM and a mid‑range GPU (an RTX 3060‑class card is a practical target) to keep models responsive. If you’re on lower‑end hardware, use smaller models and run heavy encoding after the stream.
Do I need to code to do this? No. You can get far with hotkeys, simple scripts, and ready prompts. Start with sentiment and hype timestamps—they’re the highest ROI with the least setup.